
Cowboy Quiche
Cowboy Quiche - Elk Bacon, Eggs, and Potatoes
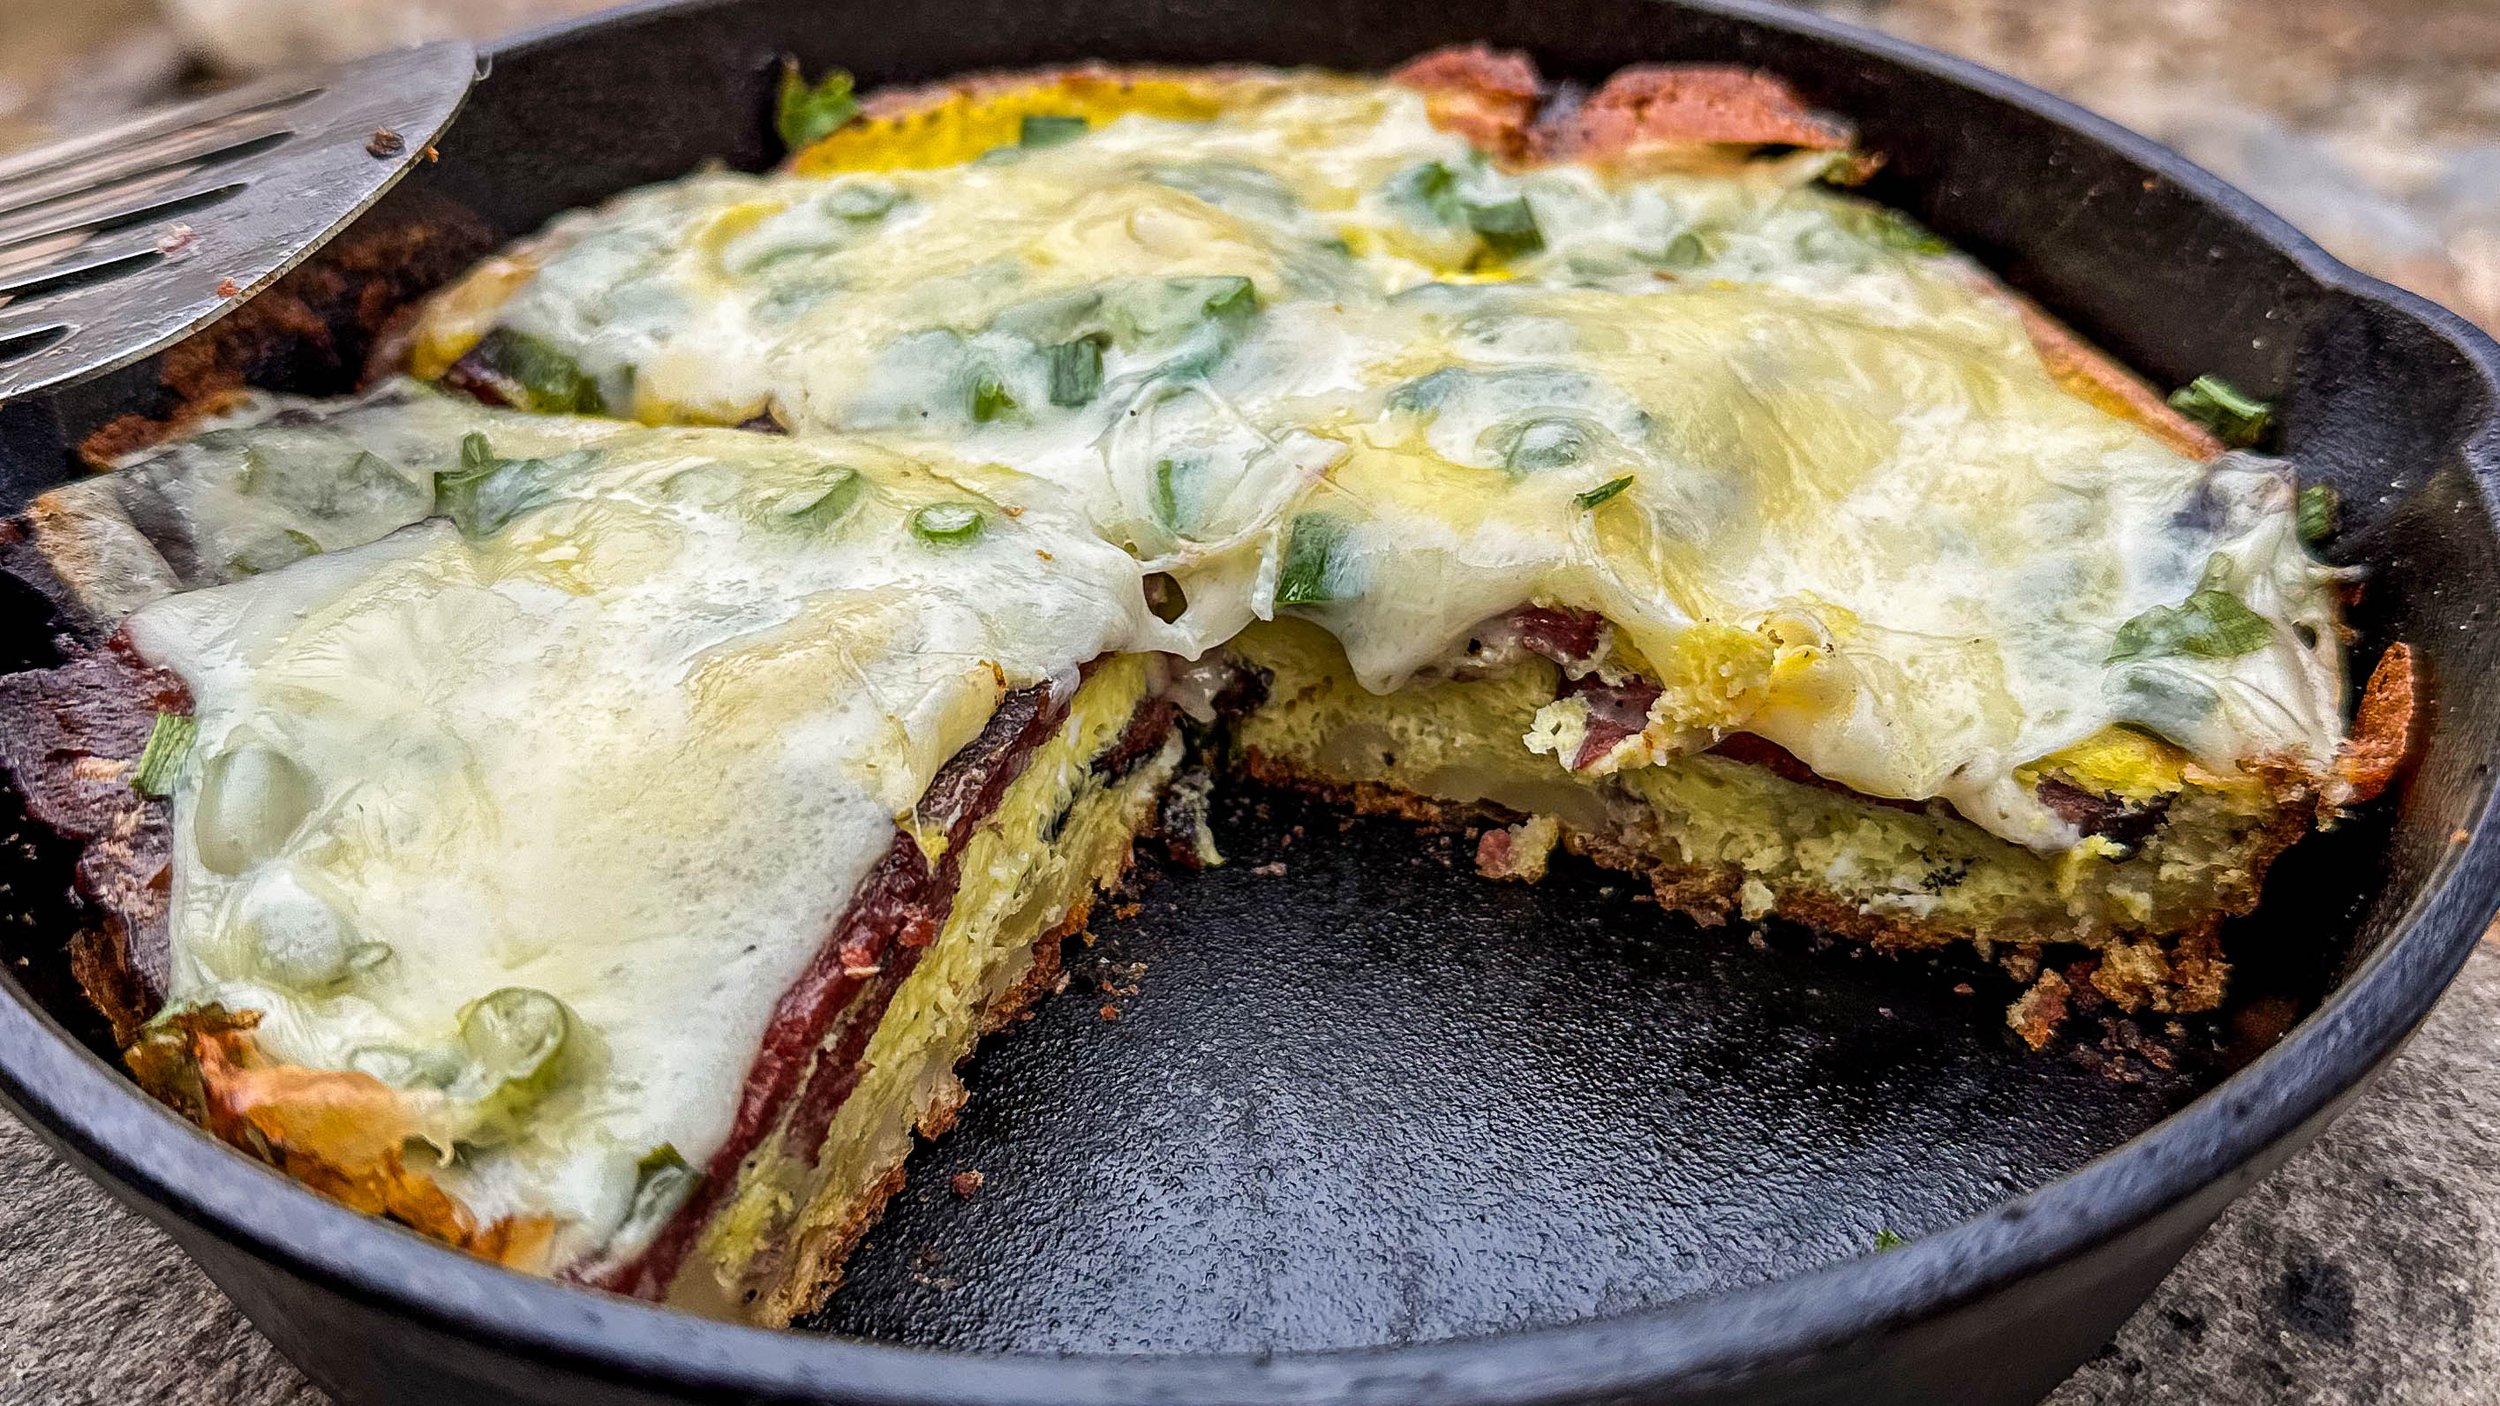
Saddle up for a taste of adventure with this Cowboy Quiche, a rugged yet refined dish that captures the spirit of western hunting. This hearty creation features fresh eggs, homemade smoked elk bacon, baby red potatoes, green onion, and fresh provolone cheese. Keeping it simple, this dish is seasoned with salt, pepper, and a hint of garlic powder. This quiche embodies the essence of cowboy cuisine, offering a savory journey through the untamed flavors of the frontier. Whether served at dawn or dusk, this Cowboy Quiche is a culinary roundup that satisfies even the heartiest appetites. Head to my Instagram (here) to watch how I made this dish!
Total Time: 1 Hour
Meal Perks: Healthy and protein-packed
Difficulty: Moderate
Ingredients: 4-5 Large Eggs | 1/4 Cup of Half n Half or Heavy Cream | Salt and Pepper | Garlic Powder | Baby Red Potatoes | Green Onion | Sliced or Shredded Provolone Cheese | Butter or Oil | Elk Bacon - Can Substitute with pork bacon
How To:
Heat up a cast iron pan on your grill or stove. In our opinion, a charcoal grill adds the best flavor.
Dice 10-15 baby red potatoes.
Add oil or butter to your pan. Add your potatoes and season with salt, pepper, and garlic powder. If you want some extra flavor, you can never go wrong by adding some Lawry’s Seasoned Salt. Cover with aluminum foil for 10-15 minutes.
Cook the elk bacon for no more than 10 minutes. In this case, the bacon has already been smoked/cooked so it just needs to be crisped.
After 15 minutes, remove the foil and smash the potatoes with a fork – this should be plenty tender. This will act as the quiche’s crust.
Top the potatoes with the elk bacon.
Grab a small bowl and add your eggs. Season with salt, pepper, garlic powder, and half n half – whip with a fork or whisk. I’ve also added Italian seasoning to this mixture and it’s great.
Pour the egg mixture over the top of the potatoes and bacon – cover with foil for 10-15 minutes.
Once the quiche is nearly cooked, slice up some green onion – add to the top of the quiche.
Finally, add your cheese and leave the pan uncovered – close the grill and its dampers and let the cheese melt. This will add that final smokey flavor.
Cut into pizza-like slices and enjoy! Pro tip: add a little bit of hot sauce or salsa to the top.

Lemon Garlic Shrimp Pasta
Lemon Garlic Shrimp Pasta
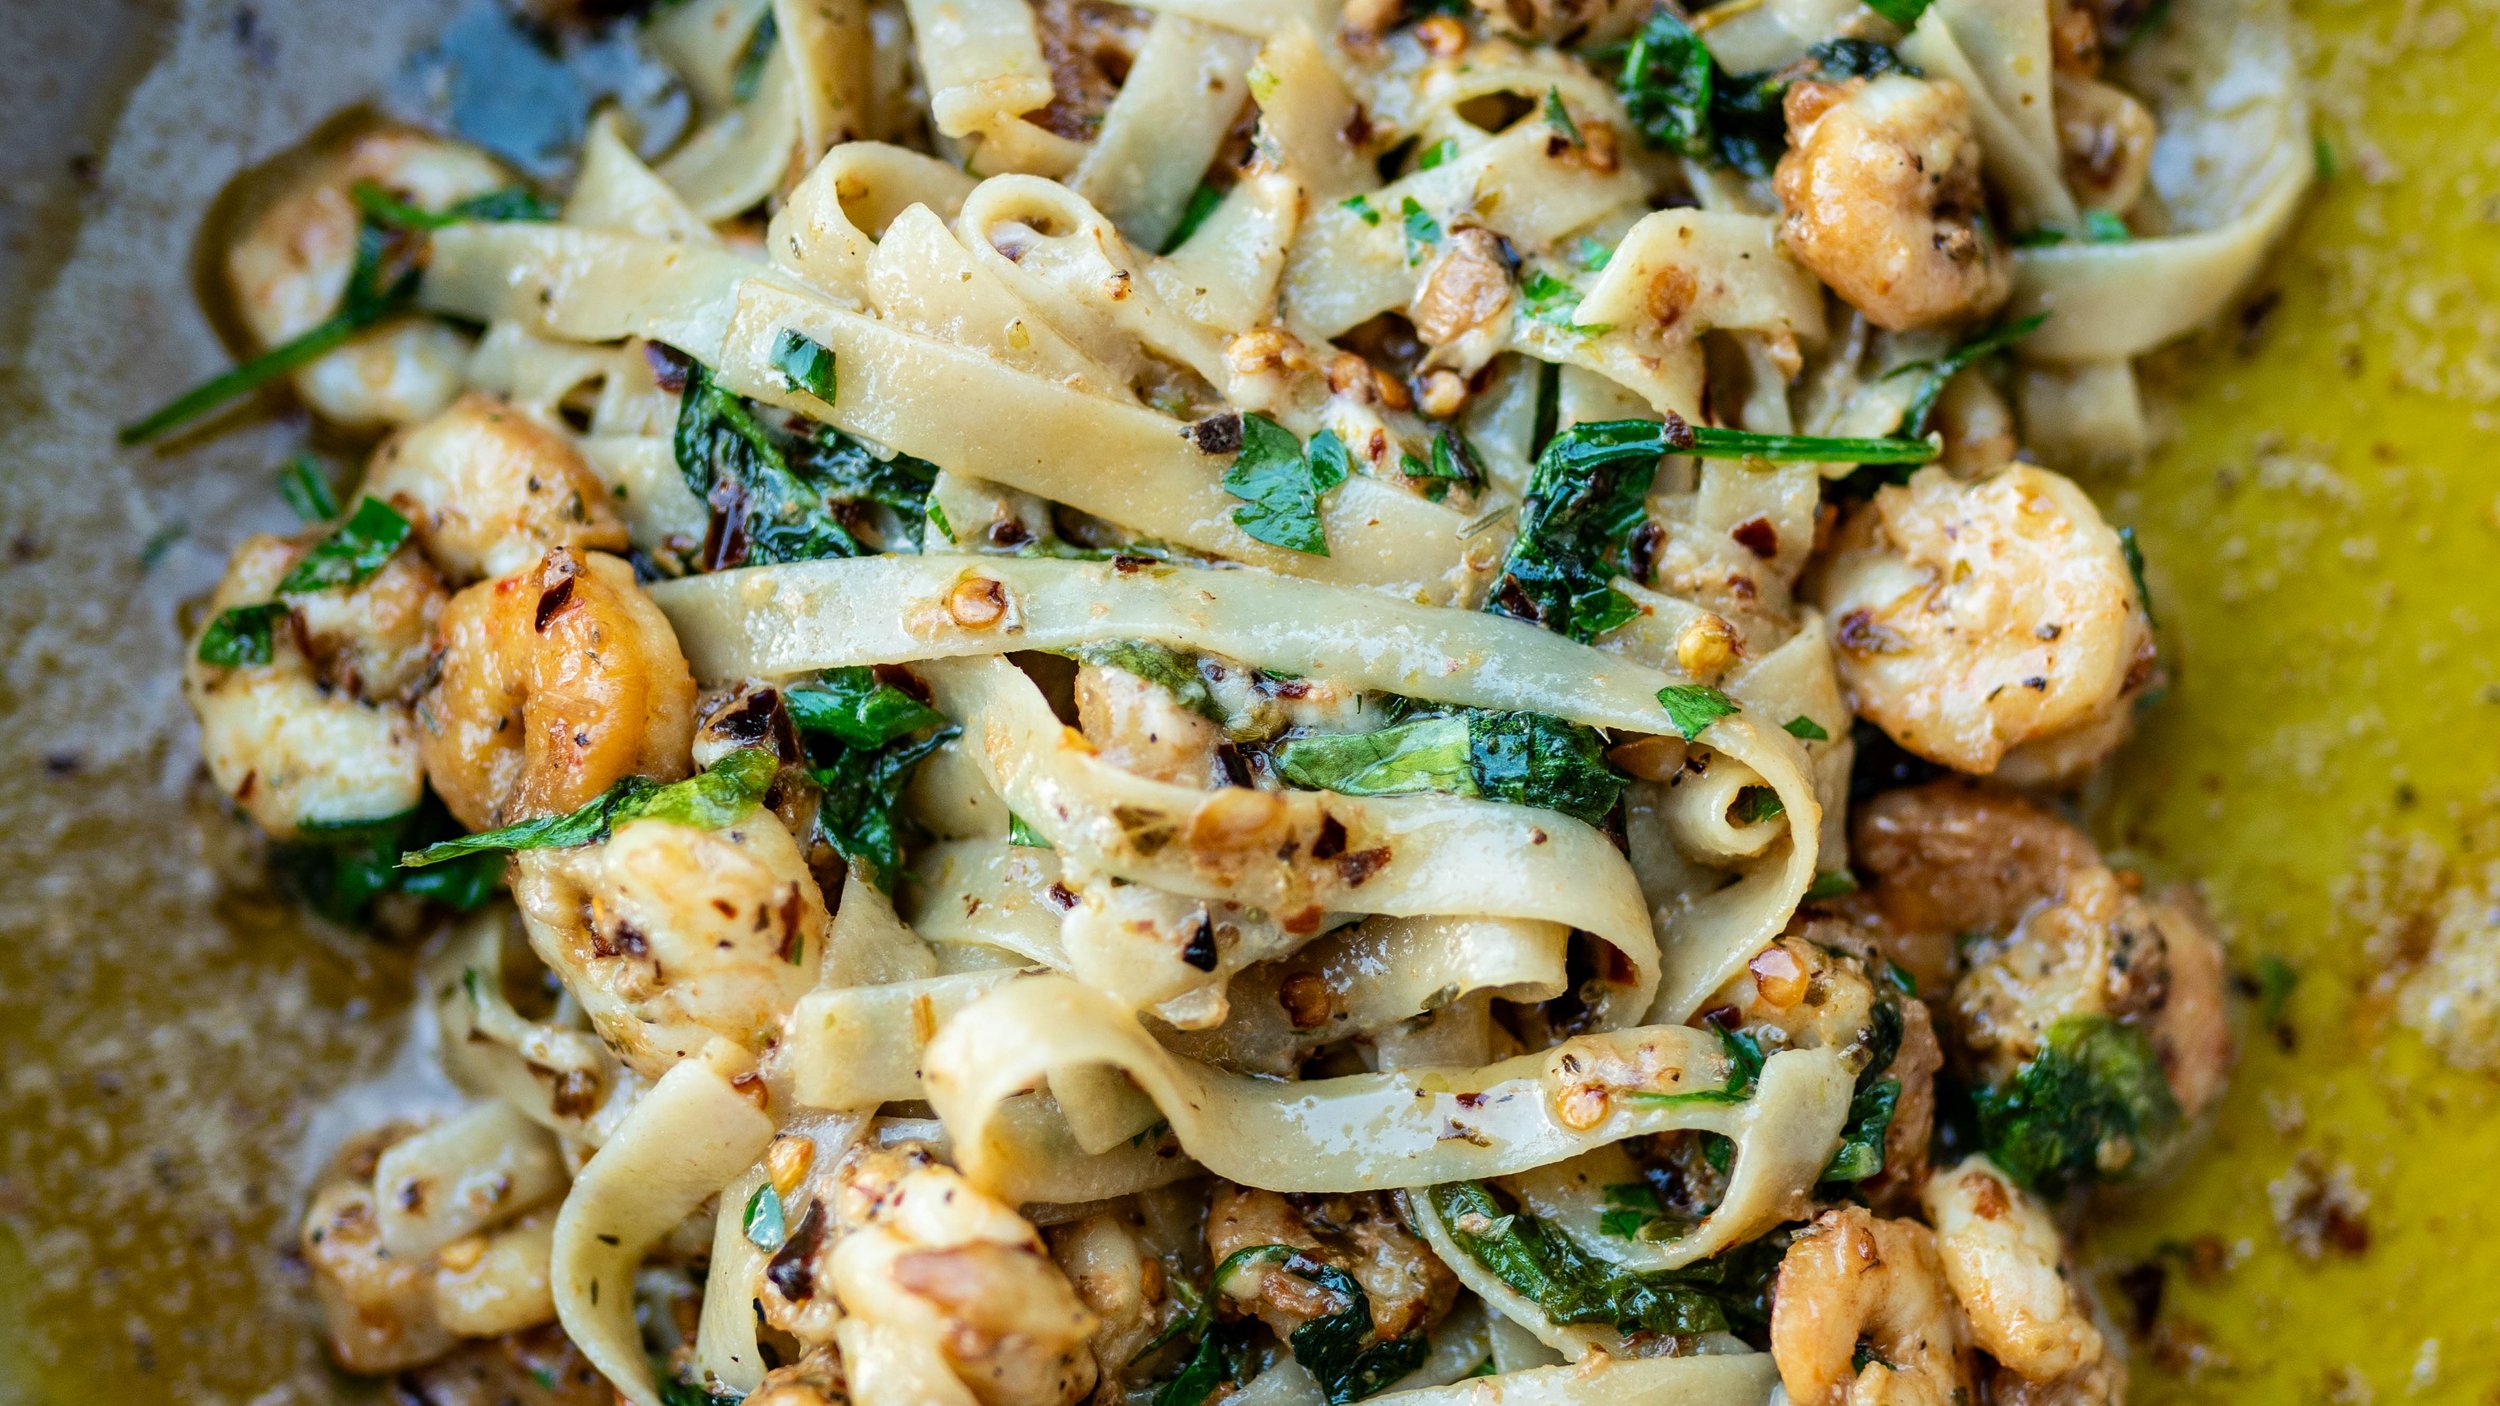
Indulge in the tantalizing flavors of this lemon garlic shrimp pasta, a dish that effortlessly combines freshness and comfort. Succulent shrimp are marinated in a harmonious blend of zesty lemon juice, aromatic garlic, and a touch of simple spices and herbs, infusing them with vibrant flavor. As they sizzle to perfection, the kitchen fills with an irresistible aroma that sets the stage for an unforgettable meal. Tossed with al dente tagliatelle, the shrimp are joined by a symphony of colors in the form of red pepper flakes and spinach. A sprinkle of grated Parmesan crowns the dish, melting into the warm tangle of pasta and seafood. Elegance and simplicity meet in this dish, offering a culinary experience that delights the senses and nourishes the soul. Head to my Instagram (here) to watch how I made this dish!
Total Time: 45 Minutes
Meal Perks: One pot, simple ingredients, crowd pleaser
Difficulty: Easy
Ingredients: 2 Tbsp Olive Oil | 1 Stick of Butter | Salt and Pepper to Taste | 4 Garlic Cloves | 1 Tbsp Red Pepper Flakes | 1lb Shrimp | 1 Tsp Italian Seasoning or Oregano | 2 Cups Baby Spinach | 1lb Tagliatelle Pasta | Grated Parmesan | 2 Tbsp Fresh Parsley | Half of a Lemon |
How To:
In a large pot, boil water and add pasta. Cook (stirring frequently) until al dente.
Drain and set pasta aside.
In the same pan, heat olive oil and 2 tablespoons of butter. Add garlic and crushed red pepper, cook until fragrant.
Toss in shrimp, salt and pepper to taste, and stir until shrimp start to turn pink, but are not fully cooked.
Add oregano or Italian seasoning and spinach — cook until wilted.
Return cooked pasta to the pot, add remaining butter, parmesan, and parsley. Stir/toss until well mixed and the butter is melted.
When the shrimp are cooked, add lemon juice, top with parmesan, mix once more, then serve while hot.

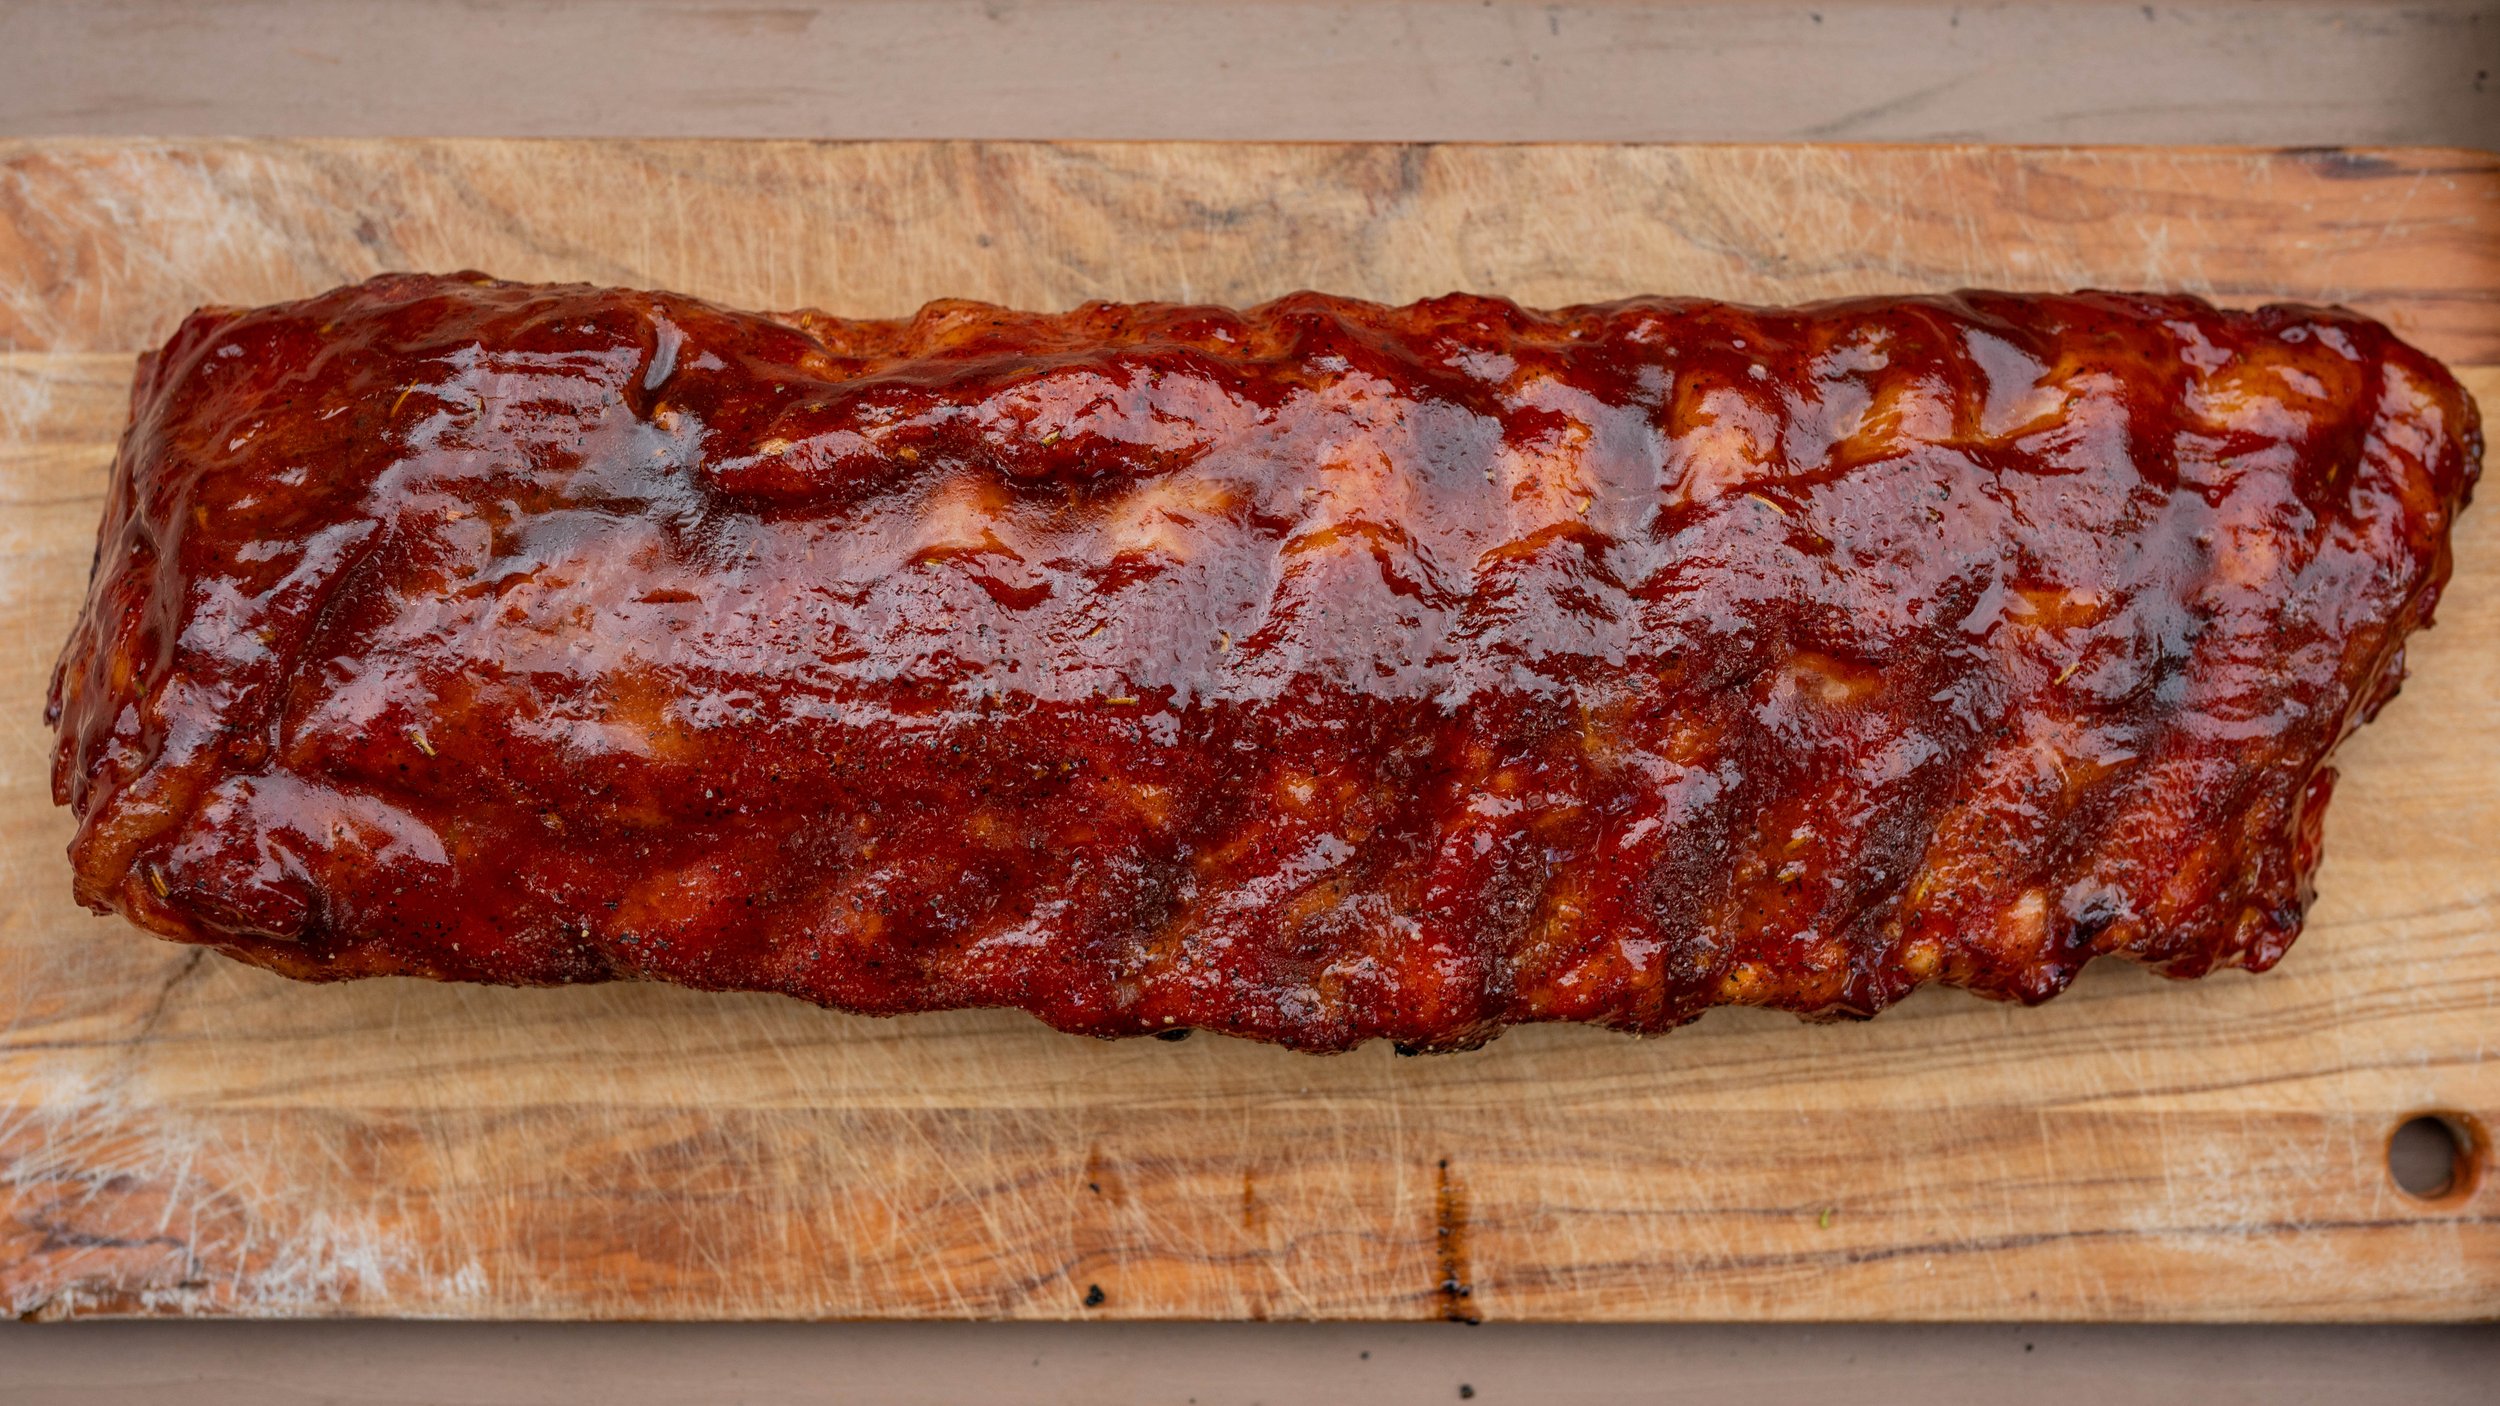
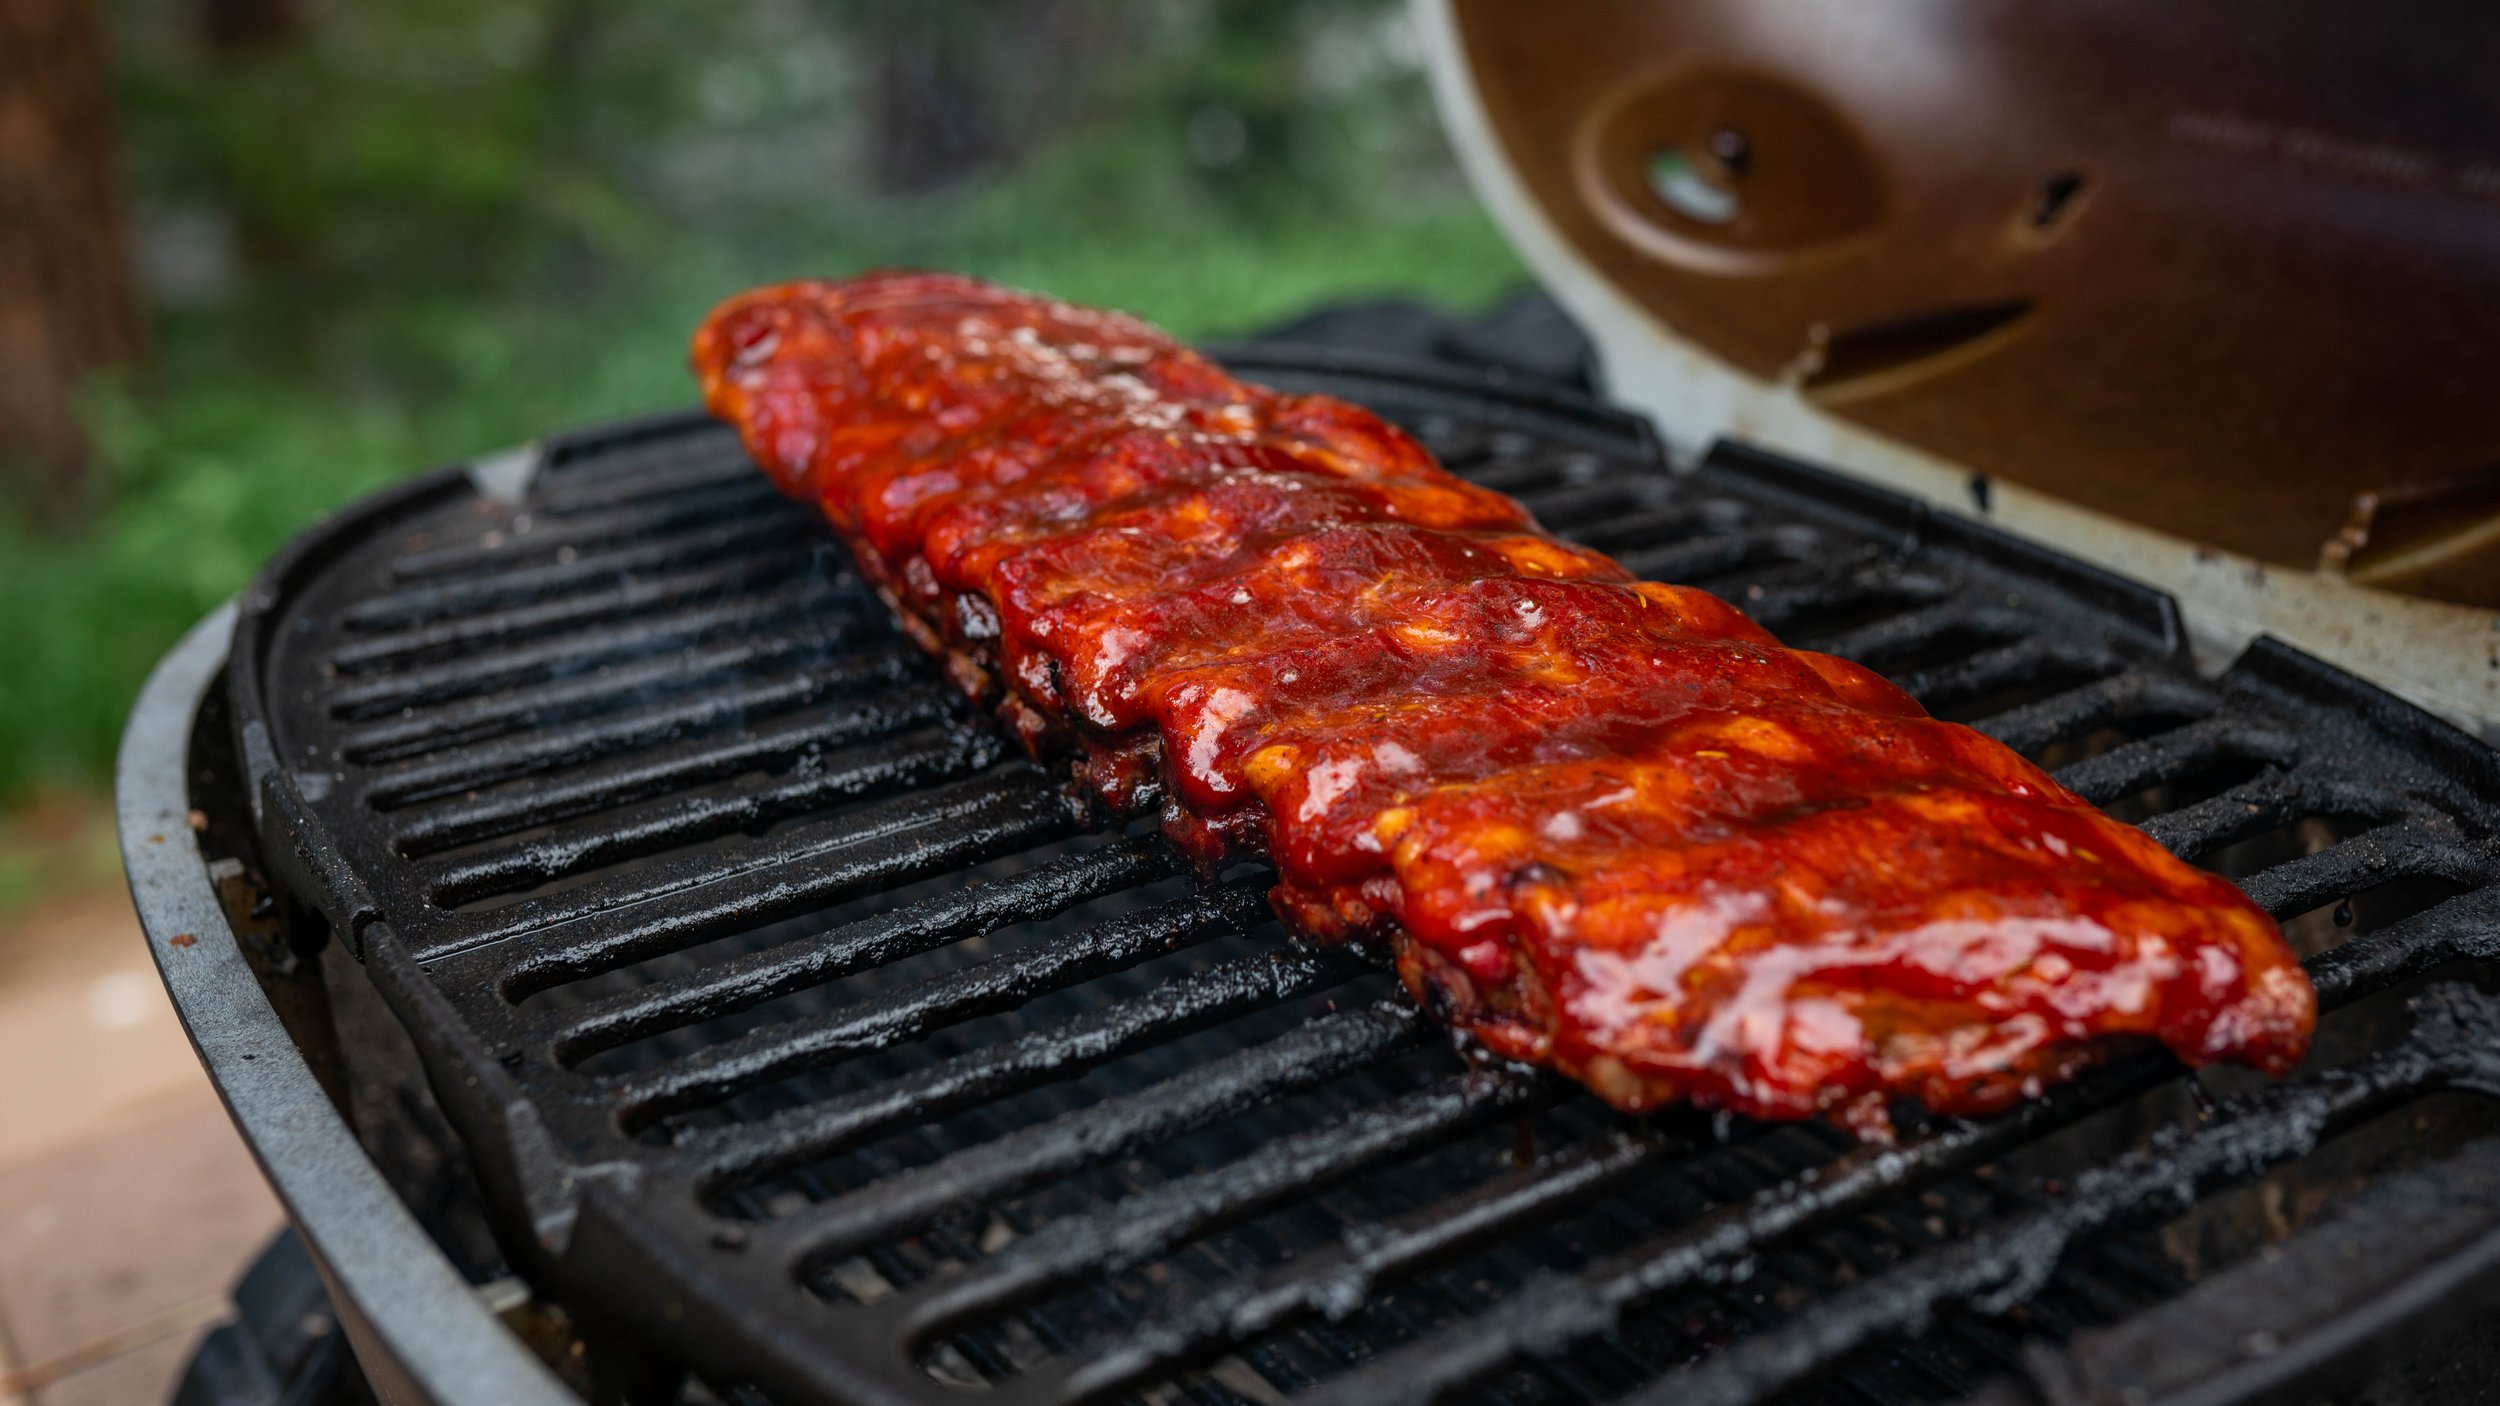
Ribs With Pasta Salad & Grilled Asparagus
Ribs With Pasta Salad & Grilled Asparagus
Honestly, I’ve never had bad ribs. I’ve had tough ribs and even dry/slightly overdone ribs, but they’re still good even if they aren’t “fall off the bone” — I hold the same philosophy when we’re talking about bacon. Because you’re cooking a piece of meat with bone(s) attached, you can play around with cooking temperatures as the bone(s) will disperse moisture to the meat as they warm. While yes, low and slow or the 2-1-1 method works great for tender ribs, you don’t have to do it every time. Because I was cooking over natural hardwood, maintaining a specific temperature isn’t as easy as an automatic pellet grill. However, because of the natural smoke and versatile dampers on the PKGO, you can have tender, crowd-pleasing ribs within an hour and a half.
Nicole and I headed up the Poudre Canyon just northwest of Fort Collins to enjoy some beautiful river views and a picnic. We prepped pasta salad and its dressing a few hours before — details below. The pasta salad and grilled asparagus complimented the ribs SO well. When I’m cooking something with BBQ sauce, I enjoy pairing it with a fresh vegetable and something that will offset the sugar or sweetness of the BBQ sauce such as a fresh coleslaw or in this instance, a pasta salad with a vinegar-based dressing.
Head to my Instagram (here) to watch how I made this dish!
Total Time: 2 hours (Prep + Cook Time)
Meal Perks: gluten-free (we used chickpea pasta), affordable, and perfect for camping.
Difficulty: Easy
Ingredients: Pork Rub | BBQ Sauce | Salt and Pepper | 1LB Rotini Pasta | Block of Mild Cheddar | Cucumber | Red Onion | Red Pepper | Green Onion | Extra Virgin Olive oil | Apple Cider Vinegar | Garlic Powder | Onion Powder | Celeary Salt | Italian Seasoning | Asparagus |
How To:
The Ribs
Generously season both sides of your ribs with a pork rub. I went with Sweet Preacher from Fire & Smoke Society. Let them sit overnight or for a minimum of 2 hours. Fire up your grill and try to keep it between 350-400 degrees (I was cooking over natural hardwood). Set the ribs directly on the grates and let cook for an hour. NOTE: Check in a few times to ensure there are no flareups/hotspots on the grill. After an hour, take your Thermapen® ONE and check your internal temperature. Once you have an internal temp of 170, it’s time to add your barbecue sauce. Once sauced, let ribs cook for another 20 minutes or until the internal temp reaches 190-200 degrees.
The Pasta Salad
This dish is always a winner. If you bring this to a party, you’ll be leaving with an empty bowl. For this batch, we used 1LB of gluten-free rotini pasta, 1 cucumber, cubed mild cheddar, 1 red onion, 1 red pepper, green onion, a few dashes of Italian seasoning, and salt and pepper — combine in a bowl and drizzle with oil — gently toss. Cover and keep cold until ready to be eaten.
The Dressing: Combine a 1/4 cup extra virgin olive oil with 3/4 cup of apple cider vinegar. Add 1 teaspoon of garlic powder and onion powder, and a 1/4 teaspoon of celery salt to the oil and vinegar mixture. Add salt and pepper to taste. NOTE: Sample your dressing. If it tastes like it’s lacking in any of the ingredients, feel free to modify it.
The Asparagus
We threw these on the grill and sprayed them with some avocado oil and kept it simple: salt and pepper with garlic powder. These only took 15 minutes (we threw them on the grill when we smothered the ribs with bbq sauce) and turned out amazing. I never grilled asparagus before and was totally blown away at how well they absorb the natural smoke — I can’t wait to have them again!

Spatchcock Chicken with Cauliflower Rice & Corn Topped With a Mexican Crema
If you’re looking for the taste of summer, this is it. Nicole and I took a cruise to our local state park and found a beautiful spot near the Horsetooth Reservoir in Fort Collins. This is the first time I spatchcocked a chicken and it was super simple. Two of the major benefits I found in using this method is that the meat really absorbs the flavor all while staying drop-dead juicy.
Earlier in the day, we prepped our cauliflower rice at home and brought it in our cooler. If you’ve never made cauliflower rice, it’s super simple! All you have to do is bake cauliflower florets until crisp/golden brown with some salt and pepper on an oiled baking sheet. Either place cauliflower in a large bowl to gently mash or use a blender. Don’t blend or mash too much – you still want it to be chunky. Head to my Instagram (here) to watch how I made this dish!
Total Cook Time: 1.5 hours
Meal Perks: Healthy, low-carb, protein-packed, and gluten-free.
Difficulty: Moderate
Ingredients: Olive Oil | Onion Powder | All-Purpose Seasoning (I went with Noble Made) | Garlic Powder | Tajin | Chili Powder | Salt & Pepper | Apple Cider Vinegar | Fresh Garlic Cloves | Frozen or Canned Corn | Cauliflower | One Yellow Onion | 2 Limes | Fresh Cilantro | Plain Yogurt | Roasted Chicken Base from Better Than Bouillon.

How To:
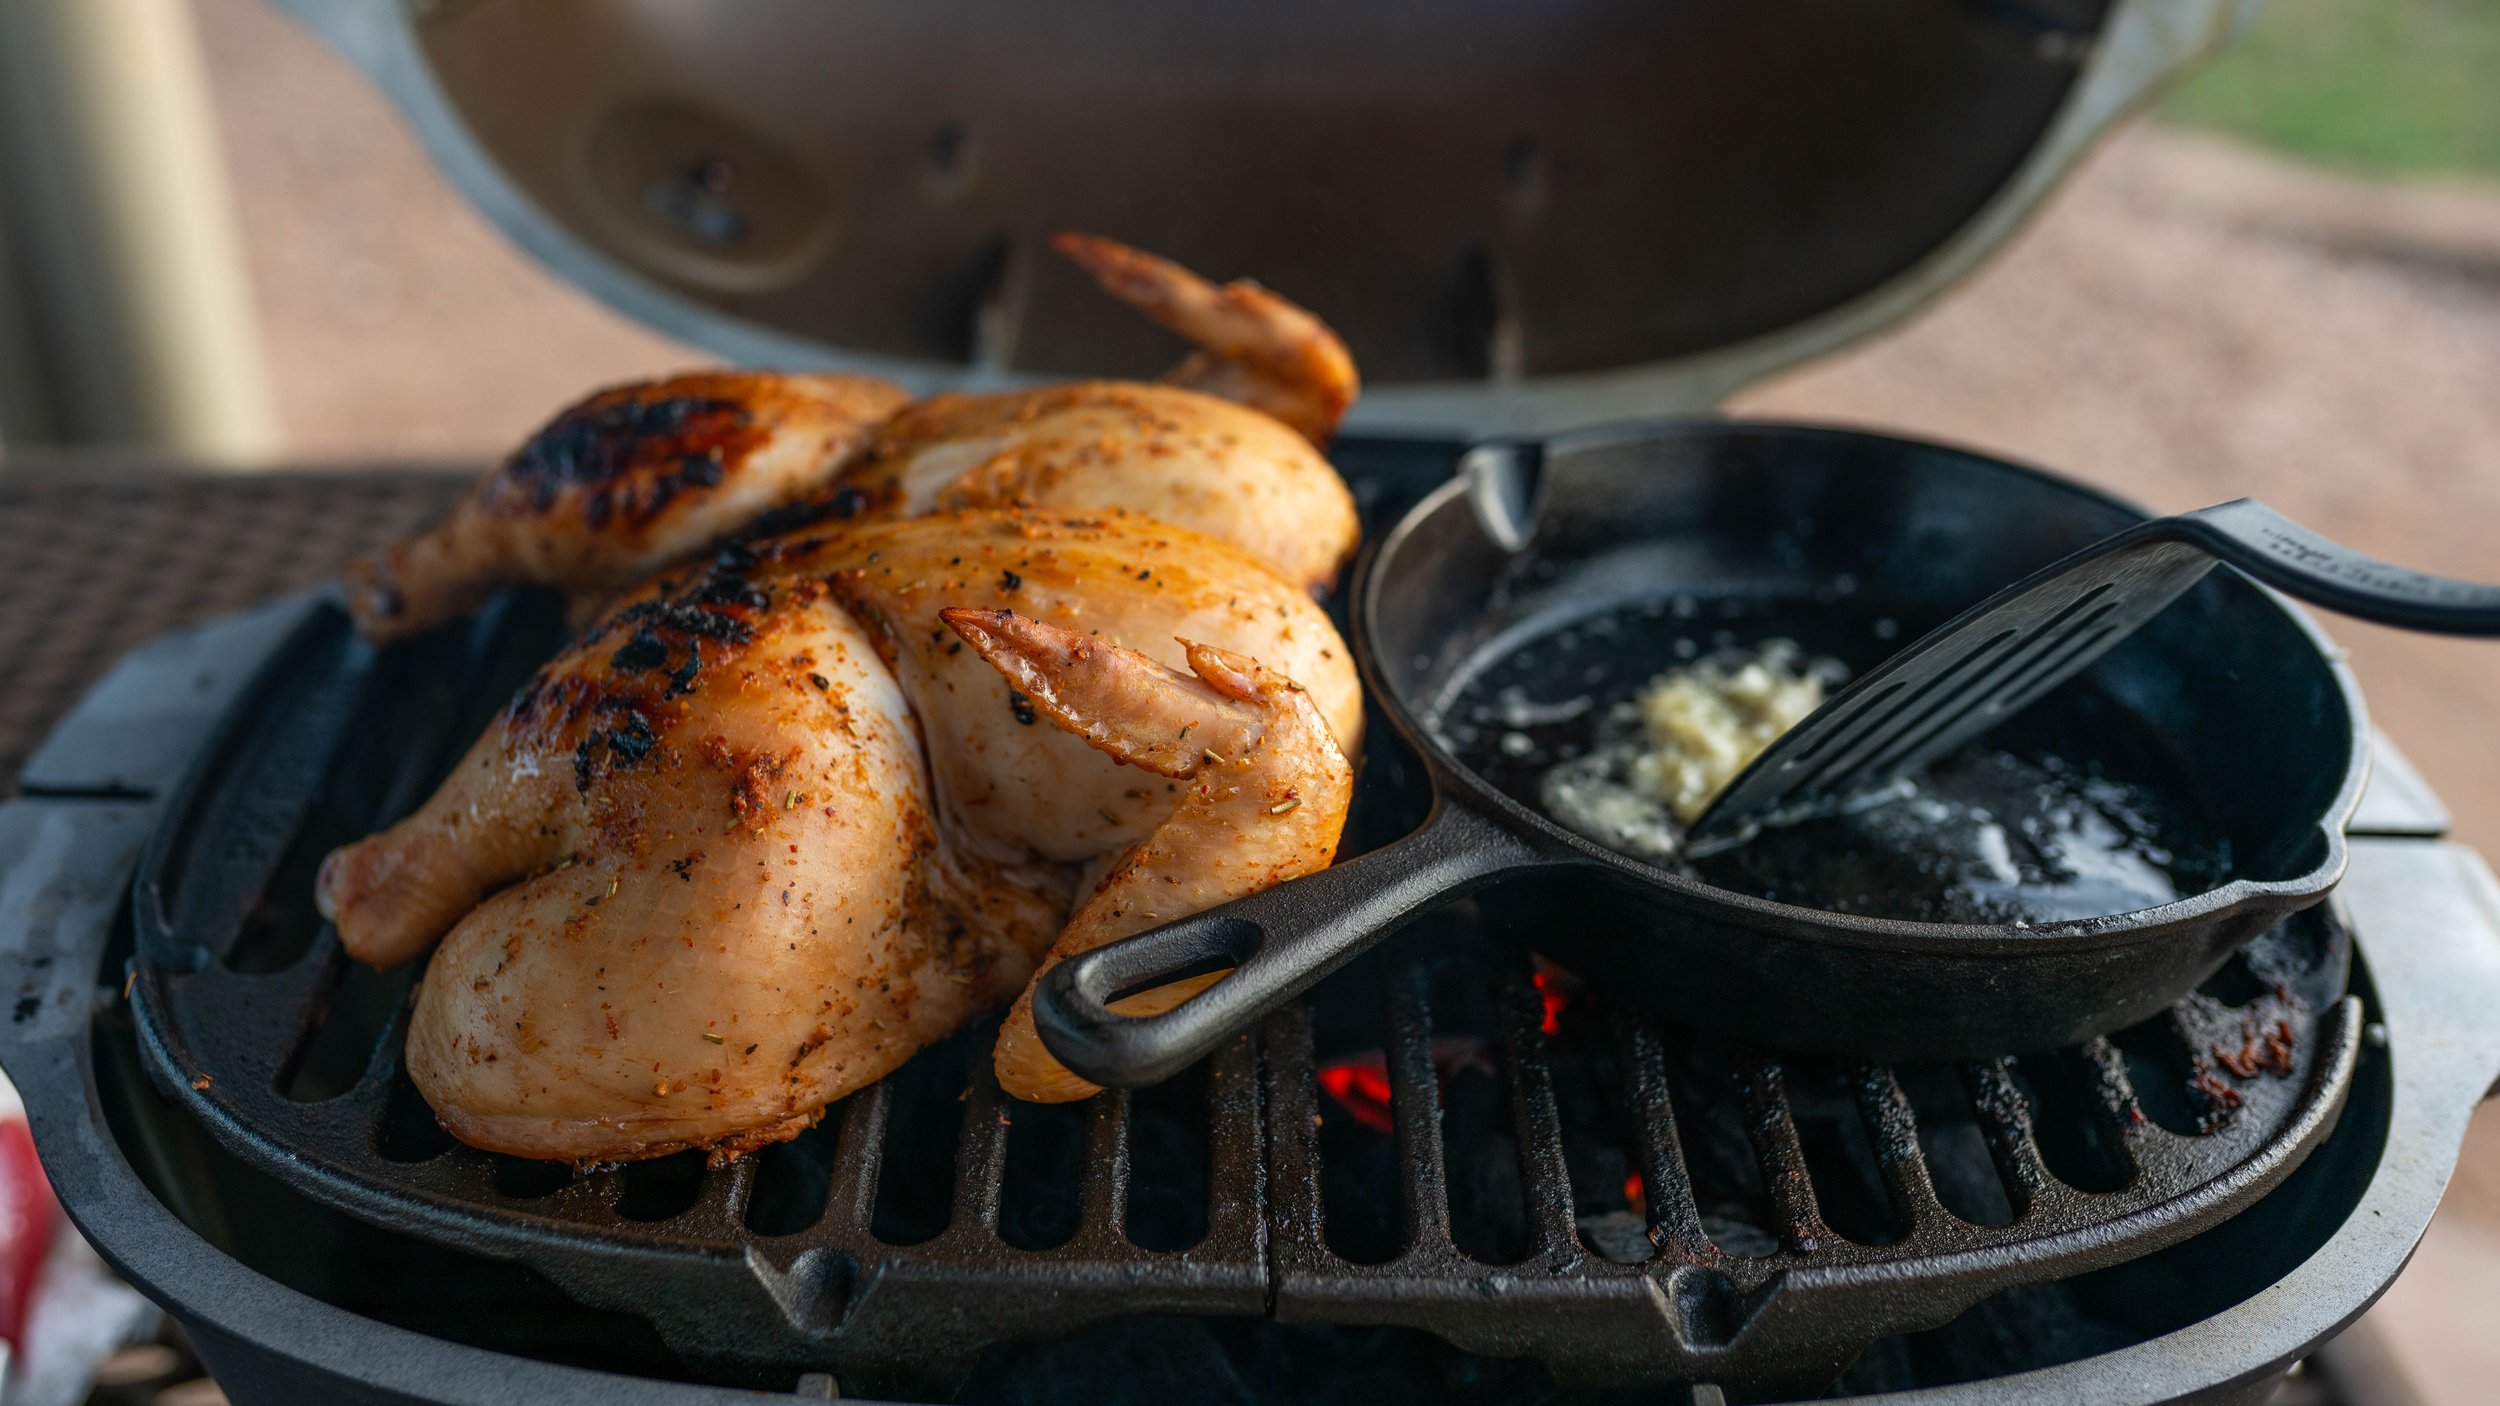
The Chicken
First, spatchcock the chicken before seasoning. Rinse the entire chicken under cold water and lather with oil. Season both sides with Onion Powder, Your choice of all-purpose seasoning (I used Noble Made), Garlic Powder, Tajin, and Chili Powder. Feel free to add salt and pepper but it isn’t necessary. Put the chicken in a sealable bag and add apple cider vinegar. Store the chicken in your fridge to let it marinate.
Fire up the PKGO and add the chicken skin side down for 20-30 minutes or until the skin is browned. Flip the chicken over and let cook for roughly an hour or until the thickest part of the chicken reaches 165-175 degrees. When cooking a chicken like this, I highly recommend using an instant meat thermometer such as the Thermapen® ONE. No matter the type of meat, I depend on this thermometer — nothing kills a great picnic like undercooked meat.
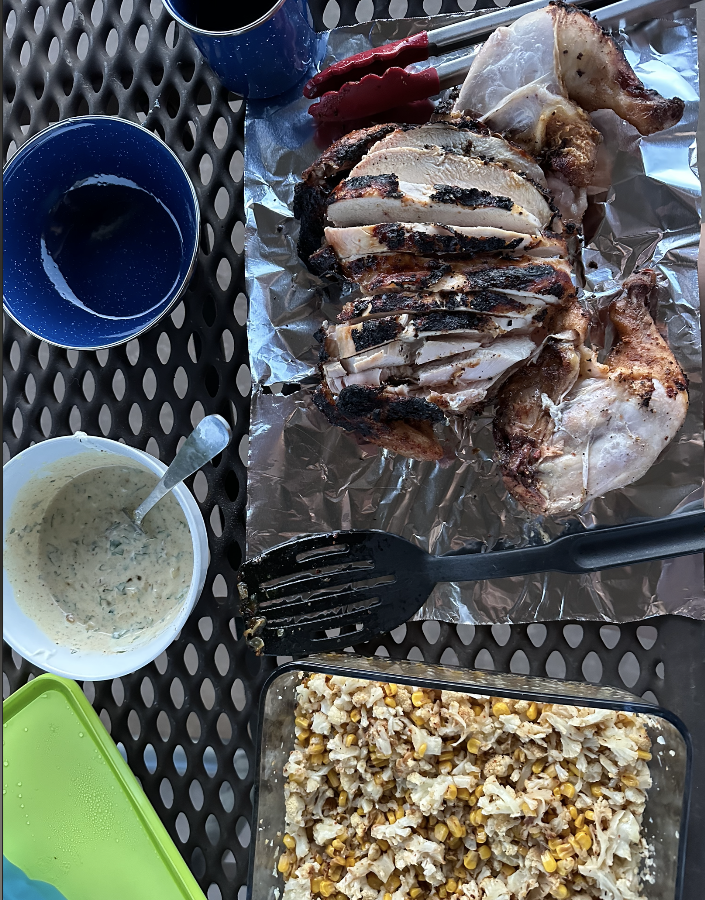
The Prepped Cauliflower Rice & Corn
Heat up a pan and add garlic. Add corn once the garlic browns – season with Tajin. Once browned, add the corn mixture to your cauliflower rice. Juice a whole lime over the cauliflower and corn – stir.
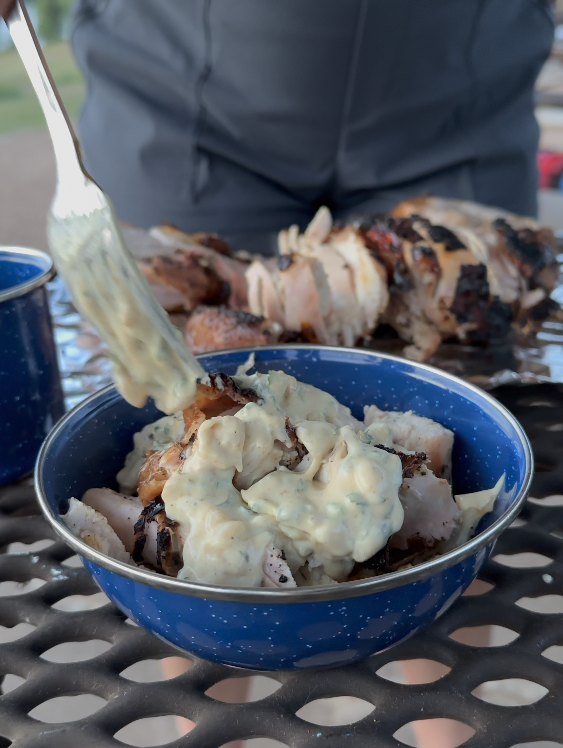
The Crema
Dice up an onion in a pan and brown. Add roasted chicken base from Better Than Bouillon and let caramelize. In a medium-sized bowl, add plain yogurt to a bowl, half of a lime, cilantro, salt, pepper, garlic powder, onion powder, and chili powder. Add your caramelized onions and stir.
How to Serve
Grab a bowl to add your cauliflower rice & corn, some juicy chicken, topped with the Mexican Crema – go ahead, be generous with it!